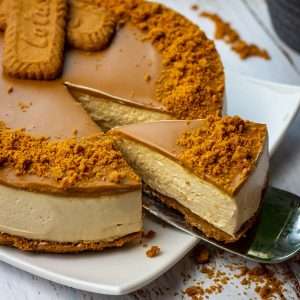
No-Bake Biscoff Cheesecake
If you are looking for an irresistible treat for your next special occasion, look no further! Lotus Biscoff spread is sweeping the world with its popularity growing by the minute! All for good reason! This 6-ingredient, super easy No-Bake Biscoff Cheesecake will have you totally obsessed! Decadently creamy and with a signature flavour of caramelised biscuits, this is one of the best desserts of the 21st century!
Equipment
- Acetate Tape optional
- Food Processor optional
Ingredients
For The Cheesecake Base:
- 200 g biscoff biscuits
- 90 g butter unsalted
For The Biscoff Filling:
- 400 g cream cheese at room temperature
- 185 g biscoff spread
- 50 g caster sugar
- 180 g double cream
For The Top & Decoration:
- 80 g biscoff spread
- 5 biscoff biscuits 3 crushed, 2 whole
Instructions
- Line a 7in (18 cm) springform cake tin base with a circle of baking parchment. If using, line the sides with clear acetate tape (it will help take the biscoff cheesecake out of the tin later, but you can do that simply by running a knife around the sides, so don't worry if you don't have any tape).
- Place biscuits into a food processor and blitz into fine crumbs. Alternatively, bash the biscuits in a large metal bowl with the end of a rolling pin.
- In the meantime, melt the butter. Pour in onto the lotus biscuit crumbs and mix.
- Spoon the mixture into the prepared cake tin and spread the mixture out to cover the surface of the base. Using a glass (or a measuring cup) with a flat bottom, press the biscuit mixture into the base. Place it in the fridge whilst you make the filling.
- In a large bowl, whip double cream (heavy cream) to medium peaks using handheld electric mixer and set it aside. Keep the mixer (not need to wash the beaters).
- Place the cream cheese, caster sugar and biscoff spread into a separate bowl. Beat the mixture with the electric mixer for 3-4 minutes (take your time, you want the mixture fully incorporated and sugar dissolved).
- Add the whipped cream and beat again just long enough to combine.
- Spoon the biscoff cheesecake filling onto the biscuit base and smooth out the surface using a spatula.
- Set the cheesecake in the fridge for 3-4 hours.
- Melt biscoff in a small saucepan (don't let it boil though) and leave to cool down slightly. You want it runny consistency, but not piping hot. Pour biscoff on top of the cheesecake and quickly swirl it around so it spread across the surface.
- Place the cheesecake back in the fridge for another 4 hours (ideally, overnight).
- Once set, remove the cheesecake from its tin. If you haven't used acetate tape, run a thin-bladed knife around the edge (making sure you go right down) before uncliping the springform tin. Otherwise, take the tin off, then carefully unpeel the clear acetate tape (more tips on clean finish in the text above).
- Crush 3 biscuits into crumbs and scatter them across the edge of the cheesecake. Place 2 remaining biscuits on top.
- Keep the cheesecake in the fridge until you are ready to serve.
Video
Notes
STORAGE: Store your cheesecake in the fridge right until the moment you wish to serve it. Once it’s decorated with biscuit crumbs and whole biscoff biscuits, it can still be stored in the fridge but the decorations will start losing their crunch after 2 days. Make sure to eat it within 3 days. It’s a perfect dessert to make ahead of time!
For more information, visit How To Store Cheesecake in The Fridge? And How To Freeze It?
Nutrition
Calories: 473kcalCarbohydrates: 37gProtein: 7gFat: 33gSaturated Fat: 16gPolyunsaturated Fat: 1gMonounsaturated Fat: 6gCholesterol: 117mgSodium: 168mgPotassium: 99mgFiber: 0.3gSugar: 16gVitamin A: 944IUVitamin C: 0.1mgCalcium: 63mgIron: 1mg
Tried this recipe?Let us know how it was!