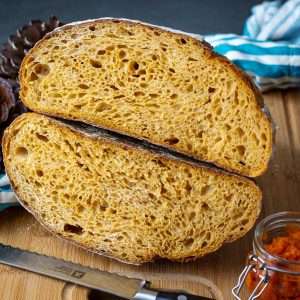
Pumpkin Sourdough Bread
Cosy autumn vibes meet the tangy twist of sourdough...This Pumpkin Sourdough Bread spiced just right and kissed with honey, is perfect for any topping, sweet or savoury! Let's celebrate autumn and make this delicious Sourdough Pumpkin Bread recipe!
Equipment
- Bench Scraper
- Razor Blade or Bread Lame
Ingredients
- 400 g strong white flour
- 8 g salt
- 1 teaspoon mixed spice or pumpkin pie spice
- 160 g pumpkin puree
- 160 g active sourdough starter 100% hydration
- 150 ml water
- 15 g clear honey
Instructions
DAY 1:
- When your sourdough starter is active and bubbly, in a bowl of your stand mixer, add the flour, spices and salt and mix everything together.
- In a jug, mix the water and honey together until honey dissolves. Add the sourdough starter and mix to combine.
- Pour the sourdough mixture into the flour. Add the pumpkin puree.
- Run the mixer for approximately 10 minutes on medium speed, until the dough looks elastic and slightly shiny.
- Scoop the dough into large clen bowl. Cover with a damp te towel or cling film and let the dough rest for 30 minutes.
- For the next 2 hours, at 30-minute internals, perform sets of coil folds (see video below).
- After 4 sets of folds, leave the pumpkin sourdough undisturbed in a warm spot for 2-3 hours, until almost doubled in size.
- At the end of bulk fermentation, using a dough scraper, scoop the dough onto a lightly floured surface. Try and make sure that the smooth top of the dough (the side that is not intact with the bowl) is placed on the floured work surface. Then swiftly fold the four corners of the dough into the centre and flip the dough over.
- With your bench scraper held at a shallow angle to the work surface, push the dough while using your hand to tuck it under itself, creating tension. This fluid circular motion involves pushing and gently rounding with the bench knife, while your free hand continues the rounding motion, tucking the dough slightly under itself. It takes some practice, but you should aim for a tight round ball of dough that holds its shape and doesn’t spread much.
- Place the dough ball into a well-floured banneton basket. The smooth side of the sourdough ball should be at the bottom, with the seam at the top.
- Pinch the seam together with your fingers, if the dough starts spreading in the bowl to make sure the dough is tight. Sprinkle with some flour, and cover the dough with a clean fabric napkin or small lightweight tea towel.
- Place the proofing basket in a large plastic bag – it will protect the dough from drying out. Then place the whole thing in the fridge for its final rise (a.k.a. second rise) in the fridge for 12-36 hours.
DAY 2:
- The next day, place the Dutch Oven in the oven, and preheat it to 240°C (typically, it is the highest temperature home ovens will go to) with the Dutch oven in it. It needs to be piping hot!
- Once the oven is hot, take the dough out of the fridge and out of the bag.
- Invert the dough gently onto a large piece of parchment paper. If your dough was properly bulk fermented and shaped correctly, it should not spread once inverted.
- Dust the surface of the dough with flour. Using a bread lame or a razor blade, score the dough deeply (approximately 1cm deep) at a 30- 45º angle.
- Take the hot Dutch Oven out of the oven, take the lid off, and lift the sourdough into it, holding the edges of the parchment paper.
- Place the lid back on the Dutch Oven and place the bread into the hot oven for 25 minutes.
- After 25 minutes, take the lid off, and return the sourdough to the oven for another 25 minutes. If you don't want your loaf of bread too dark in colour, you can reduce the oven temperature to 200°C.
- Once baked, take the Dutch Oven out of the oven. Lift the bread out by holding the corners of the parchment paper. Place the bread onto the wire rack, and slide the parchment paper from underneath the loaf.
- Leave the sourdough to cool down to room temperature before slicing.
Video
Nutrition
Calories: 141kcalCarbohydrates: 29gProtein: 5gFat: 1gSaturated Fat: 0.1gPolyunsaturated Fat: 0.2gMonounsaturated Fat: 0.1gSodium: 261mgPotassium: 63mgFiber: 1gSugar: 2gVitamin A: 2076IUVitamin C: 1mgCalcium: 10mgIron: 1mg
Tried this recipe?Let us know how it was!