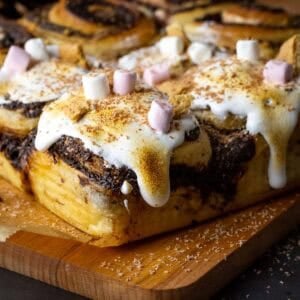
Sourdough S'mores Rolls
Soft, pillowy sourdough s'mores rolls swirled with milk chocolate, gooey mini marshmallows and crushed graham crackers, finished with a thick swoosh of marshmallow fluff. Baked in a 9-inch square pan, this is a campfire s'more reimagined as an enriched sourdough roll.
Equipment
- Stand Mixer fitted with dough hook attachment
- 23x23cm (9-inch) square baking pan, high-sided
- Cook's blow torch (optional, for toasting the marshmallow topping)
Ingredients
For the dough:
- 160 g active sourdough starter 100% hydration
- 320 g strong white bread flour
- 30 g granulated sugar
- 6 g (1 tsp) fine sea salt
- 100 g whole milk
- 2 medium eggs room temperature
- 100 g unsalted butter softened and cubed
For the s'mores filling:
- 150 g milk chocolate finely chopped
- 50 g unsalted butter cubed
- 40 g double cream or heavy cream
- 15 g cocoa powder
- pinch of fine sea salt
- 70 g graham crackers crushed into coarse crumbs (digestive biscuits work as a substitute)
- 100 g mini marshmallows
For the marshmallow fluff topping:
- 150 g marshmallow fluff marshmallow creme
For the garnish:
- 30 g milk chocolate shaved or roughly chopped (or use milk chocolate chips)
- 2 graham crackers crushed (or digestive biscuits)
- Extra mini marshmallows torched
Instructions
DAY 1:
Feed Sourdough Starter
- Feed your sourdough starter 4–6 hours before mixing, so it's active, at least doubled in size and domed on top.
Mix The Dough
- In the bowl of a stand mixer fitted with the dough hook, combine the flour, sugar and salt. Add the milk, eggs and active starter. Mix on low speed for 5–7 minutes until you have a shaggy, sticky dough.
- Cover and rest for 10–15 minutes. This hydrates the flour and makes the butter easier to incorporate.
- With the mixer running on medium speed, add the softened butter a few cubes at a time, letting each addition disappear before adding more. Keep mixing for 10–15 minutes until the dough is smooth and elastic and passes the windowpane test (stretch a small piece thin enough to see light through without it tearing).
Bulk Fermentation and Cold Proof
- Transfer to a lightly greased bowl, cover, and bulk ferment at 20–24°C (68–75°F) for 4–6 hours, undisturbed. Enriched dough won't double here, look for a gentle 20–25% rise and a slightly domed, puffy surface.
- Cover tightly and refrigerate for 8–16 hours. The cold proof firms the butter and makes the dough far easier to roll out the next day.
DAY 2:
Make The Filling
- Make the filling: warm the butter and cream in a small saucepan until the butter melts (don't let it boil). Off the heat, add the chopped milk chocolate, leave for a minute to soften, then whisk until smooth. Whisk in the cocoa powder and salt. Cool for 30–45 minutes until thick enough to hold its shape on the back of a spoon, milk chocolate sets softer than dark, so give it a proper cool before spreading.
Shaping and Second Rise
- Grease a 23x23cm (9-inch) square pan and line with parchment, leaving an overhang on two sides to lift the rolls out later.
- Turn the chilled dough onto a floured surface and roll into a rectangle roughly 40x30cm.
- Spread the cooled chocolate filling to the edges. Scatter over the crushed graham crackers and mini marshmallows.
- Cut the rolled-out dough into strips and then roll each of them up tightly, adding any marshmallows that try to escape. Alternatively, roll the dough into a tight log from the long edge and pinch the seam shut first.
- Trim the uneven ends, then cut into 9 even rolls (about 4cm thick) using a sharp knife or a length of unflavoured dental floss.
- Arrange the rolls cut-side up in the pan in a 3x3 grid, with a little gap between each, they'll expand and meet as they proof.
- Cover loosely with oiled cling film and proof at 22–25°C (72–77°F) for 4–5 hours, until visibly puffy, expanded by around 75%, and the rolls are touching.
Baking
- Near the end of proofing, preheat the oven to 180°C fan/200°C conventional (400°F).
- Bake for 28-30 minutes until golden. The marshmallow in the filling caramelises fast, so if the tops are colouring before the centre's cooked through, tent loosely with foil for the last 10 minutes.
- Cool in the pan for 25-30 minutes. You want warm, not hot, or the fluff topping will slide straight off.
Marshmallow Topping
- Spread the marshmallow fluff generously over the warm rolls.
- For a toasted finish, run a cook's blow torch lightly over the fluff, or slide the pan under a hot grill for 30–60 seconds. Watch it constantly, it goes from toasted to burnt in seconds.
- Scatter over the chocolate shavings (or chips), crushed graham crackers and extra marshmallows, and serve warm.
Video
Notes
Some of the mini marshmallows inside the filling will melt into gooey pockets, and some will caramelise where they touch the pan edges. Both are normal, not a sign anything's gone wrong, see the full explanation in the post above.
Without coil folds, the dough relies entirely on the mixer for strength, carry on until the dough passes the windowpane test.
Storage: best eaten the day they're made because of the fluff topping. Keep covered at room temperature for up to 2 days, or refrigerate for up to 4. To freeze, freeze the baked rolls without the topping, wrapped well, for up to 2 months, then thaw, warm through and top with fresh fluff before serving.
Nutrition
Calories: 563kcalCarbohydrates: 78gProtein: 9gFat: 27gSaturated Fat: 15gPolyunsaturated Fat: 1gMonounsaturated Fat: 7gTrans Fat: 1gCholesterol: 82mgSodium: 107mgPotassium: 178mgFiber: 3gSugar: 34gVitamin A: 595IUVitamin C: 0.03mgCalcium: 48mgIron: 2mg
Tried this recipe?Let us know how it was!