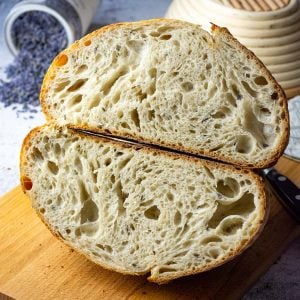
Honey and Lavender Sourdough Bread
Floral, fragrant, and gently sweet — this lavender honey sourdough bread is everything a summer loaf should be. Dried culinary lavender and a drizzle of honey are folded into a simple artisan dough, producing a beautifully scented loaf that pairs perfectly with soft goat's cheese, salted butter, or a cheese board. Don't worry about it tasting like soap — get the quantity right and it smells like a French lavender field, not a bathroom.
Equipment
- Bench Scraper
- Razor Blade or Bread Lame
Ingredients
- 500 g strong bread flour at least 12% protein content
- 10 g sea salt
- 300 g water
- 160 g active sourdough starter 100% hydration
- 20 g clear honey approximately 1 tablespoon
- 3 g dried culinary lavender approximately 1 tablespoon, loosely packed
Instructions
DAY 1:
Feeding Your Starter
- First thing in the morning, feed your sourdough starter. I typically feed 70g of my starter in a ratio of 1 part starter : 1 part water : 1 part flour — so 70g starter, 70g water, 70g flour. Scoop into a clean jar and leave in a warm spot (21–27°C), semi-covered, for 4–5 hours. Your starter should at least double in volume during this time. If it doesn't, give it a couple of good feeds before using it.
Autolyse
- About 30 minutes before your starter is ready, combine the flour and water in the bowl of your stand mixer. Mix briefly with the dough hook on low for 1–2 minutes until you have a shaggy, rough dough with no dry bits of flour remaining. Cover the bowl with a damp tea towel and leave to autolyse for 30 minutes. This short rest allows the flour to fully hydrate and starts gluten development without any kneading — it makes the dough noticeably easier to handle and gives you better structure.
Mixing The Dough
- Once your starter is active, bubbly, and at least doubled in volume, add it to the autolysed dough. Run the stand mixer on medium with the dough hook for 8–10 minutes, until the dough is smooth and elastic.
- Reduce the speed to low, add the salt, honey, and dried lavender all at once. Mix for a further 2–3 minutes until everything is fully incorporated and the lavender is evenly distributed throughout the dough. The dough should feel soft and slightly tacky but not sticky.
Coil Folds and Bulk Fermentation
- Scoop the dough into a large bowl, cover with a damp kitchen towel or plastic wrap, and leave in a warm place (21–27°C) for 30 minutes.
- After 30 minutes, with cold wet hands, perform the first set of coil folds. Lift the dough from the sides with both hands and tuck it under itself to form a coil. Rotate the bowl a quarter turn and repeat. Cover and rest for 30 minutes. Repeat every 30 minutes for a total of 4–6 sets of coil folds. By the final set, your dough should be noticeably less sticky, soft, and elastic, with visible blisters forming on the surface.
- Once coil folds are complete, cover and leave to finish bulk fermentation at warm room temperature for 1.5–2.5 hours (shorter in summer, longer in a cool kitchen).
- Important: The honey in this dough gives the yeast extra fuel, which can speed up bulk fermentation — particularly in a warm summer kitchen. Watch your dough rather than watching the clock. Bulk fermentation is complete when the dough has increased by around 75% in volume (just under doubling), looks puffy and aerated, and bubbles are visible on the sides and base of the bowl. Do not let it fully double — in warm conditions, that can happen quickly and you risk over-fermentation.
Shaping and Final Proof
- At the end of bulk fermentation, using a bowl scraper, turn the dough out onto a lightly floured surface, smooth side down. Fold the four corners into the centre, then flip the dough over.
- Using a bench scraper held at a shallow angle to the surface, push the dough while your free hand tucks it under itself, building tension. Work the dough into a tight round ball that holds its shape and doesn't spread.
- Place the shaped dough ball smooth-side down into a well-floured banneton (rice flour is best for lining). Pinch the seam at the top to keep the shape tight. Dust with flour and cover with a light tea towel or cloth napkin.
- Place the banneton inside a large plastic bag to prevent the dough from drying out. Refrigerate for 12–36 hours for the cold proof (final rise).
DAY 2:
Preheating The Oven
- Place the Dutch Oven in the oven and preheat to 240°C (460°F). The Dutch Oven should be piping hot all the way through.
Scoring The Dough
- Once the oven is fully hot, take the dough straight from the fridge (do not allow it to come to room temperature — cold dough scores more cleanly). Remove the banneton from the bag and invert the dough gently onto a large piece of parchment paper.
- Dust the surface with a little flour. Using a bread lame or razor blade, score the dough firmly at a 30–45° angle, approximately 1cm deep. One confident slash is all you need for an open ear.
Baking
- Carefully remove the hot Dutch Oven from the oven and take off the lid. Lift the dough into the pot using the edges of the parchment paper, keeping the scored slash open as you lower it in. Replace the lid.
- Bake with the lid on for 35 minutes.
- After 35 minutes, remove the lid and return the loaf to the oven for a further 15 minutes. The honey in the dough means the crust can darken a little faster than a plain sourdough — keep an eye on the colour. If it's browning too quickly, reduce the temperature to 200°C for the last 10 minutes. You're looking for a deep golden-brown crust.
Cooling
- Lift the loaf out of the Dutch Oven using the parchment paper and place on a wire rack. Slide the paper out from underneath.
- Leave to cool completely before slicing — at least 1 hour, ideally 2. The lavender fragrance really comes through as the loaf cools, and the crumb needs time to set. Slicing too early will give you a gummy interior.
Notes
On culinary lavender: Always use food-grade dried culinary lavender — not aromatherapy, cosmetic, or decorative lavender. In the UK, you can find it in health food shops, online from Steenbergs or Sous Chef, or in some larger Waitrose stores. If your lavender is very fresh and strongly fragrant, reduce to 2g on your first bake and adjust from there.
On honey: Runny clear honey works best as it distributes evenly through the dough. Set honey or raw honey can be used but may need a brief warm (not hot) to loosen before adding.
On timing: This dough ferments a little faster than a plain sourdough due to the honey. In a warm kitchen (24°C+), your total bulk fermentation time from first mix to shape could be as little as 5–6 hours. Stay observant and use visual cues rather than strict timings.
Nutrition
Calories: 2013kcalCarbohydrates: 410gProtein: 64gFat: 9gSaturated Fat: 1gPolyunsaturated Fat: 4gMonounsaturated Fat: 1gSodium: 3903mgPotassium: 511mgFiber: 13gSugar: 18gVitamin A: 19IUVitamin C: 0.5mgCalcium: 94mgIron: 5mg
Tried this recipe?Let us know how it was!