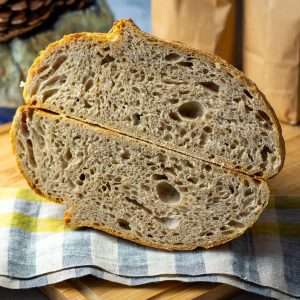
Barley Sourdough Bread
Barley Sourdough Bread brings a lesser-used, but beautiful grain to your loaf, adding a subtle sweetness and a hint of nuttiness that makes it seriously moreish. The step-by-step recipe will take you through the making of sourdough, with insights into how barley flour affects sourdough every step of the way. From mixing to baking, every detail is covered to help you master the perfect loaf with confidence.
Equipment
- Bench Scraper
- Proofing Basket
- Razor Blade or Bread Lame
Ingredients
- 300 g strong bread flour with at least 12% protein content
- 100 g barley flour
- 7 g salt
- 160 g active sourdough starter 100% hydration
- 250-260 ml water
Instructions
DAY 1:
Feeding Sourdough Starter
- First thing in the morning, feed your sourdough starter and leave it in a warm spot (ideally, 21-27°C), semi-covered for 4 hours. Your starter should at least double in volume in this time. If it doesn’t, it may need a couple of good feeds before it’s fit for purpose.
Mixing The Dough
- Once the sourdough starter is active and bubbly (and at least doubled in volume), mix the dough. Mix strong white flour, barley flour and salt in the bowl of a stand mixer.
- Add sourdough starter and water.
- Run the mixer, fitted with a dough hook attachment for 10 minutes, until your dough is smooth and elastic. It does not need to pass the windowpane test just yet (the gluten will continue developing when we fold the dough).
Coil Folds And Bulk Fermentation
- Scoop the dough into a large bowl, cover with a damp kitchen towel or plastic wrap and leave it in a warm place (21-27°C) for 30 minutes.
- After 30 minutes, with cold wet hands, perform the first set of coil folds. Simply lift the bread dough with both hands from the sides and tuck it under to form a coil (video below). Rotate the bowl a quarter turn and coil again. Cover the bowl again, and let the dough rest for 30 minutes again.
- You should repeat the process every 30 minutes until you have done 4-6 sets of coil folds. Your dough will spread less with every set of folds, and by the end of it, you will have a much less sticky, very soft and elastic dough that has blisters on top of the dough. For more information on how to coil fold and when to know when you’ve done enough folding, head to our dedicated article about Sourdough Coil Folds.
- Once all the folds have been completed, cover the dough and let the dough rise at warm room temperature for 2-3 hours to finish bulk fermentation. Your dough should just about double its original size. If you are using a see-through glass bowl for bulk fermenting, you should see a lot of activity and bubbles forming at the base and sides of the bowl.
Shaping and Final Proof
- At the end of bulk fermentation, using a bowl scraper, scoop the dough onto a lightly floured surface. Try and make sure that the smooth top of the dough (the side that is not intact with the bowl) is placed on the floured work surface. Then swiftly fold the four corners of the dough into the centre and flip the dough over.
- Cupping the ball of dough with your hands, drag it against the work bench to create surface tension - you should see some blisters coming to the surface of the dough. You should aim for a tight round ball of dough that holds its shape and doesn’t spread much.
- Place the dough ball into a well-floured banneton basket (or any proofing basket alternatives). We recommend using rice flour for dusting your proofing baskets. The smooth side of the sourdough ball should be at the bottom, with the seam at the top.
- Pinch the seam together with your fingers, if the dough starts spreading in the bowl to make sure the dough is tight. Sprinkle with some flour, and cover the dough with a clean fabric napkin or small lightweight tea towel.
- Then place the whole thing in the fridge for its final rise (a.k.a. second rise) in the fridge for 12-36 hours.
DAY 2:
- The next day, place the Dutch Oven in the oven, and preheat it to 240°C (typically, it is the highest temperature home ovens will go to) with the Dutch oven in it. It needs to be piping hot!
Scoring The Dough
- Once the oven is hot, take the dough out of the fridge.
- Invert the dough gently onto a large piece of parchment paper. If your dough was properly bulk fermented and shaped correctly, it should not spread once inverted.
- Dust the surface of the dough with flour. Using a bread lame or a razor blade, score the dough deeply (approximately 1cm deep) at a 30- 45º angle. One single deep slash is all that’s needed for that sought-after sourdough “ear”.
Baking
- Take the hot Dutch Oven out of the oven, take the lid off, and lift the sourdough into it, holding the edges of the parchment paper. Be mindful of how you lift the paper. Sometimes, the scored slash can begin to close up during this process. To prevent this, lift the parchment from the sides that won’t push the two edges of the scored dough back together.
- Place the lid back on the Dutch Oven and place the bread into the hot oven for 35 minutes.
- After 35 minutes, take the lid off, and return the sourdough to the oven for another 15-20 minutes. If you don’t want your loaf of bread too dark in colour, you can reduce the oven temperature to 200°C.
Cooling
- Once baked, take the Dutch Oven out of the oven. Lift the bread out by holding the corners of the parchment paper. Place the bread onto the wire rack, and slide the parchment paper from underneath the loaf.
- Leave the barley sourdough to cool down to room temperature before slicing.
Video
Nutrition
Calories: 1574kcalCarbohydrates: 323gProtein: 51gFat: 7gSaturated Fat: 1gPolyunsaturated Fat: 3gMonounsaturated Fat: 1gSodium: 2737mgPotassium: 610mgFiber: 18gSugar: 2gVitamin A: 6IUCalcium: 86mgIron: 5mg
Tried this recipe?Let us know how it was!