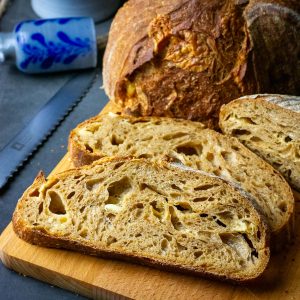
Marmite Sourdough Bread With Cheddar
If you’ve ever wondered whether Marmite Sourdough belongs in your oven, let me warn you now: this loaf divides households. This cheese and marmite sourdough bread recipe is bold, savoury and unapologetically punchy — and while I sit firmly on the Marmite-hater side of life, my husband ranks this in his top three inclusions I’ve ever baked. If you’re a fan (or even Marmite-curious), this Vegemite sourdough deserves your attention.
Equipment
- Dough Scraper
- Proofing Basket
- Razor Blade or Bread Lame
Ingredients
- 500 g strong bread flour with at least 12% protein content
- 4 g salt
- 160 g active sourdough starter 100% hydration
- 40 g marmite/ vegemite
- 300 g water
- 120 g mature cheddar cheese cubed
Instructions
DAY 1
- First thing in the morning, feed the sourdough starter and leave it in a warm place (ideally between 21-27°C), loosely covered, for 4 hours. The starter should double in size by then. If it doesn't, it might need a few more good feedings to be ready.
Mixing The Dough
- Combine flour and salt in the bowl of a stand mixer.
- In a separate bowl or a jug, combine water, marmite and active sourdough starter. Pour the wet ingredients into the dry ingredients.
- Fitted with a dough hook attachment, run the stand mixer for 10-15 minutes until your dough is smooth and elastic. It does not need to pass the windowpane test just yet (the gluten will continue developing when we fold the dough during the bulk fermentation period).
Bulk Fermentation and Coil Folds
- Scoop the dough into a large bowl, cover with a damp kitchen towel or plastic wrap (a.k.a. cling film) and leave it in a warm place (21-27°C) for 30 minutes.
- After 30 minutes, with cold wet hands, perform the first set of coil folds. Simply lift the bread dough with both hands from the sides and tuck it under to form a coil. Rotate the bowl a quarter turn and coil again. Cover the bowl again, and let the dough rest for 30 minutes again.
- Repeat the coil folds three more times at 30 minute intervals (4 sets total). After the last coil fold, your dough should feel a lot less sticky and feel strengthened and elastic.
- Cover and let the dough rise and finish its bulk fermentation undisturbed for 2-3 hours. The dough should just about double in size from its original size.
Add Cheese, Shaping and Cold Retardation
- At the end of bulk fermentation, using a bowl scraper scoop the dough onto a lightly floured surface. Try to make sure that the smooth top of the dough (the side that is not in contact with the bowl) is placed on the floured work surface. Stretch the dough into a large rectangle by tugging on the edges of the dough, and spread half of the cubes cheese across the surface.
- As you shape the dough into a boule or a batard, keep adding the rest of the cheese before folding the dough over - see how I do it in a video below.
- Place the shaped dough into a well-floured banneton basket (or any proofing basket alternatives). We recommend using rice flour for dusting your proofing baskets. The smooth side of the sourdough ball should be at the bottom, with the seam at the top.
- Pinch the seam together with your fingers, if the dough starts spreading in the bowl to make sure the dough is tight. Sprinkle with some flour, and cover the dough with a clean fabric napkin or small lightweight tea towel.
- Place the proofing basket in a large plastic bag - it will protect the dough from drying out. Then place the whole thing in the fridge for its final rise (a.k.a. second rise) for 12-18 hours.
DAY 2
- The next day, place the Dutch Oven in the oven, and preheat it to 240°C (typically, it is the highest temperature home ovens will go to) with the Dutch oven in it. It needs to be piping hot.
Scoring
- Once the oven is hot, take the dough out of the fridge and out of the bag.
- Invert the dough gently onto a large sheet of parchment paper. If your dough was properly bulk fermented and shaped correctly, it should not spread once inverted.
- Using a bread lame or a razor blade, score the dough deeply (approximately 1-2 cm deep) at a 30- 45º angle. One single deep slash is all that's needed for that sought-after sourdough "ear".
Baking and Cooling
- Take the hot Dutch Oven out of the oven, take the lid off, and lift the sourdough into it, holding the edges of the parchment paper. Be mindful of how you lift the paper. Sometimes, the scored slash can begin to close up during this process. To prevent this, lift the parchment from the sides that won’t push the two edges of the scored dough back together.
- Place the lid back on the Dutch Oven and place the bread into the hot oven for 30 minutes.
- After 35 minutes, take the lid off, and return the sourdough to the oven for another 15-18 minutes to turn golden brown. You may reduce the temperature to 200°C for the uncovered bake to control the browning of the crust. We highly recommend not baking this loaf uncovered for too long, as the crust turns bitter.
- Once baked, take the Dutch Oven out of the oven. Lift the bread out by holding the corners of the parchment paper. Place the bread onto the wire rack, and slide the parchment paper from underneath the loaf.
- Leave the sourdough to cool down to room temperature before slicing.
Video
Nutrition
Calories: 2514kcalCarbohydrates: 404gProtein: 102gFat: 50gSaturated Fat: 24gPolyunsaturated Fat: 5gMonounsaturated Fat: 10gCholesterol: 120mgSodium: 3714mgPotassium: 1433mgFiber: 16gSugar: 3gVitamin A: 1212IUCalcium: 960mgIron: 6mg
Tried this recipe?Let us know how it was!