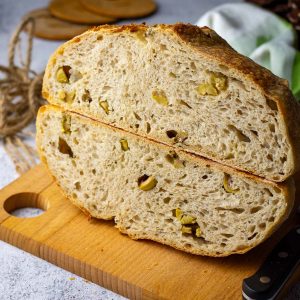
Green Olive Sourdough Bread With Roasted Garlic
Olive lovers, this one’s for you—packed with salty olives and tucked into a chewy crumb with a beautifully crisp crust. This Olive Sourdough With Roasted Garlic is bold, briny, and anything but boring.
Equipment
- Bench Scraper
- Proofing Basket
- Razor Blade or Bread Lame
Ingredients
Mix-Ins
- 1 small garlic bulb
- 1 tablespoon olive oil
- 100 g pitted green olives
- 1 teaspoon dried thyme
Sourdough
- 400 g strong bread flour with at least 12% protein content
- 240 ml water
- 6 g salt
- 160 g active sourdough starter 100% hydration
Instructions
DAY 1
- First thing in the morning, feed the sourdough starter and leave it in a warm place (ideally between 21-27°C), loosely covered, for 4 hours. The starter should double in size by then. If it doesn’t, it might need a few more good feedings to be ready. If it doesn't, head to our article Sourdough Starter Not Doubling Within 4 Hours. How To Fix It?
Roast Garlic
- Preheat the oven to 200°C Fan. Cut the top of the bulb of garlic off, drizzle with olive oil and wrap in foil. Place in the oven for 40 minutes. Then unwrap and let it cool slightly.
- Halve or quarter the olives and place them in a bowl. Add thyme. Finally, squeeze all the roasted garlic flesh into the same bowl and mix. Cover and place in the fridge until you're ready to use it.
Autolyse
- Before your starter reaches its peak, start the autolyse. In a bowl of your stand mixer, combine the flour and water into a dry-ish shaggy dough. Simply run the mixer for 1-2 minutes, then cover the bowl with a damp towel and leave the flour to hydrate for 30-60 minutes.
Mixing The Dough
- Sprinkle salt over the hydrated flour and add the active sourdough starter to the shaggy dough mixture. Run the stand mixer for 10-15 minutes until your dough is smooth and elastic. It does not need to pass the windowpane test just yet (the gluten will continue developing when we fold the dough during the bulk fermentation period).
Bulk Fermentation and Coil Folds
- Scoop the dough into a large bowl, cover with a damp kitchen towel or plastic wrap (a.k.a. cling film) and leave it in a warm place (21-27°C) for 30 minutes.
- After 30 minutes, with cold wet hands, perform the first set of coil folds. Simply lift the bread dough with both hands from the sides and tuck it under to form a coil. Rotate the bowl a quarter turn and coil again. Cover the bowl again, and let the dough rest for 30 minutes again.
- Repeat the coil folds twice more. After the third coil fold, your dough should feel a lot less sticky and feel strengthened and elastic. This is important for the next step – lamination!
Laminating The Mix-Ins and Extra Coil Folds
- Wet the surface of a large area of the kitchen surface (you can spray it or simply use your hands to make the surfaces wet). Scoop the dough out onto a wet surface and stretch it out as much as you can without tearing it.
- Scatter ⅓ of olives all over the middle section of the dough. Then fold one side over the mix-ins. Scatter another ⅓ on top of the folded-over area and fold the other side over. This should look like a large dough pamphlet at this stage.
- Scatter half of the remaining mix-ins in the centre of the pamphlet, then fold the top over. Finally, scatter the remaining mix-ins over the folded-over bit, and fold the bottom over. Please refer to the video below for a better explanation. You should now be left with a parcel of laminated sourdough.
- Place the dough into the mixing bowl you used before, cover and let the dough rise undisturbed for 2-3 hours. The dough should just about double in size from its original size.
Shaping and Cold Retardation
- At the end of bulk fermentation, using a bowl scraper scoop the dough onto a lightly floured surface. Try and make sure that the smooth top of the dough (the side that is not contact with the bowl) is placed on the floured work surface. Then, swiftly fold the four corners of the dough into the centre and flip the dough over.
- Flip the dough seam-side down and use your hands to cup and rotate it, pulling it slightly against the surface to form a smooth, tight ball.
- Place the dough ball into a well-floured banneton basket (or any proofing basket alternatives). We recommend using rice flour for dusting your proofing baskets. The smooth side of the sourdough ball should be at the bottom, with the seam side up.
- Pinch the seam together with your fingers, if the dough starts spreading in the bowl to make sure the dough is tight. Sprinkle with some flour, and cover the dough with a clean fabric napkin or small lightweight tea towel.
- If your fridge tends to dry things out, place the proofing basket in a large plastic bag.Then place the whole thing in the fridge for its final rise (a.k.a. second rise) in the fridge for 12-36 hours.
DAY 2
Scoring The Sourdough
- The next day, place the Dutch Oven in the oven, and preheat it to 240°C (typically, it is the highest temperature home ovens will go to) with the Dutch oven in it. It needs to be piping hot!
- Once the oven is hot, take the dough out of the fridge and out of the bag.
- Invert the dough gently onto a large sheet of parchment paper. If your dough was properly bulk fermented and shaped correctly, it should not spread once inverted.
- Dust the surface of the dough with flour. Using a bread lame or a razor blade, score the dough deeply (approximately 1cm deep) at a 30- 45º angle. One single deep slash is all that’s needed for that sought-after sourdough “ear”.
Baking and Cooling
- Take the hot Dutch Oven out of the oven, take the lid off, and lift the sourdough into it, holding the edges of the parchment paper. Be mindful of how you lift the paper. Sometimes, the scored slash can begin to close up during this process. To prevent this, lift the parchment from the sides that won't push the two edges of the scored dough back together.
- This element contains hidden/special characters that may cause formatting issues. Consider re-creating this content directly in the block editor and avoid copy/pasting.
- Place the lid back on the Dutch Oven and place the bread into the hot oven for 25 minutes.
- After 25 minutes, take the lid off, and return the sourdough to the oven for another 25 minutes to turn golden brown.
- Once baked, take the Dutch Oven out of the oven. Lift the bread out by holding the corners of the parchment paper. Place the bread onto the wire rack, and slide the parchment paper from underneath the loaf.
- Leave the sourdough to cool down to room temperature before slicing.
Video
Nutrition
Calories: 1866kcalCarbohydrates: 326gProtein: 53gFat: 36gSaturated Fat: 5gPolyunsaturated Fat: 6gMonounsaturated Fat: 22gSodium: 3909mgPotassium: 463mgFiber: 14gSugar: 2gVitamin A: 439IUVitamin C: 1mgCalcium: 145mgIron: 5mg
Tried this recipe?Let us know how it was!