
There's something magical about a loaf that crackles as it cools, and this sesame sourdough delivers just that. The nutty crunch of sesame seed sourdough makes it feel a little fancy, but it's still the kind of bread you'll want to tear into on a Tuesday. Simple, hearty, and just the right amount of extra.

Jump to:
As an Amazon Associate I earn from qualifying purchases, at no extra cost for you! Thank you!
How Will Mix-Ins Affect Sourdough Baking?
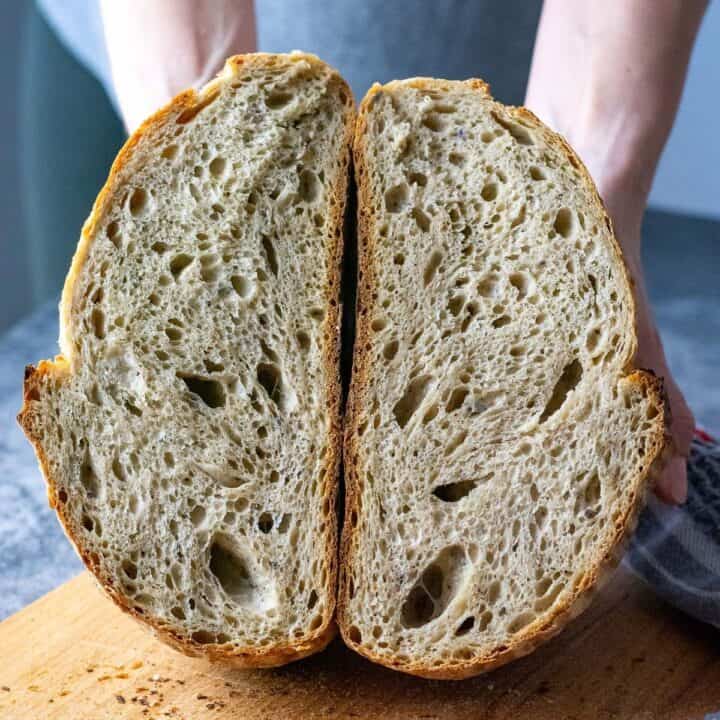
Sourdough Hydration. Ingredients like honey and tahini add liquid as well as sugars and fats, which change how the dough absorbs water and interacts with the wild yeast. We do not pre-soak sesame seeds in this recipe - they will absorb moisture during fermentation - so the dough will start off wetter and finish a lot stiffer.
Bulk Fermentation. Sugars from honey can speed up the fermentation process, while the oils in tahini may slightly slow gluten development. The key is monitoring the dough and adjusting timings to keep fermentation on track for a beautiful loaf.
Dough Handling. Adding seeds increases texture and weight, which can make dough handling trickier. Wet hands and gentle coil folds are essential to maintain structure without tearing.
Flavour. Honey adds subtle sweetness, while tahini and sesame contribute a rich, nutty taste. The end result is both complex and inviting.

Mix It Up: Turn Your Sourdough into a Flavour Adventure.
Ingredient Notes
The following ingredients were used to make this Sesame Sourdough Bread:
- strong bread flour: with at least 12% protein content. You may replace up to 20% of white bread flour with whole wheat flour, but you will likely need to increase hydration, as whole grain flour is thirstier.
- sea salt.
- sesame seeds: we used a mixture of black sesame seeds and white sesame seeds.
- active sourdough starter: 100% hydration, that is, fed equal parts of flour and water.
- water: use lukewarm water to kickstart the bulk fermentation process.
- honey: optional, but it helps balance the bitterness of sesame seeds.
- tahini: optional, but it adds another layer of sesame flavour to the dough, plus it makes the crumb extra creamy.

As always, find ingredient quantities, detailed instructions and nutritional information in the recipe card at the bottom of the post.
Step-By-Step Method
Feeding Your Starter
1. First thing in the morning, feed your sourdough starter. Leave it at room temperature until it reaches its sweet spot - active, bubbly, and roughly doubled in size. This usually takes 4-6 hours if fed in the ratio of 1:1:1 at ambient temperature.
Mixing the Dough
1. In a large mixing bowl, combine the flour and sesame seeds.
2. In a separate jug, mix the water, honey, tahini (if using) and salt until fully dissolved.
3. Add the active starter to the liquid mixture, then pour it over the flour and seeds.
4. Mix with a stand mixer fitted with a dough hook for 8-10 minutes until a sticky but cohesive dough forms.


Coil Folds and Bulk Fermentation
1. Transfer the dough to a lightly oiled large bowl, cover with plastic wrap, and let it dough rest for 30 minutes.
2. Using wet hands, perform coil folds: lift the dough from the sides and fold it underneath. Rotate the bowl a quarter turn and repeat. You may stretch and fold if that's your preferred method.
3. Repeat folding every 30 minutes for a total of 4 folds, then leave the dough in a warm spot for 2-3 hours to complete bulk fermentation.


Shaping and Cold Proof
1. Gently transfer the dough onto a lightly floured work surface. Fold the corners to the centre and form a tight ball.
2. Press the top of the dough into a shallow bowl of sesame seeds so the bottom sticks, then place it seed-side down into a proofing basket.
3. Cover the basket with plastic wrap or place it in a plastic bag and place in the fridge for 12-36 hours to cold proof.

Scoring and Baking
1. The next day, preheat your Dutch oven to 240°C.
2. Carefully invert the dough onto a piece of parchment paper, then score the top of the dough with a sharp blade.
3. Lift the dough using the parchment into the hot Dutch oven. Cover with the lid and bake for 30 minutes.
4. Remove the lid, reduce oven temperature to 200°C, and bake for another 20 minutes until golden brown.

Cooling
1. Lift the bread onto a wire rack using the piece of parchment paper and allow it to cool to room temperature before slicing.
Important Tips For Best Results
- Soften sesame seeds for a tender crumb. If you prefer less crunch, soak the sesame seeds in warm water for 10-15 minutes using a seed soaker, then drain and gently pat dry before incorporating them into the dough. You may need to slightly reduce the water in your recipe (by 5-10 ml) to account for the extra moisture. You may skip the sesame crust, too.
- Enhance sesame flavour. Add a tablespoon of sesame seed oil to the dough, or use toasted sesame seeds that go into the dough for deeper, nuttier notes. The seeds on the crust will naturally toast in the oven.
- Adjust bulk fermentation times. Kitchens vary - watch the dough, not the clock.
- No Dutch oven? Place a tray of water or a few ice cubes at the bottom of the oven to create steam. This replicates the enclosed environment of a Dutch oven and helps develop a crisp crust and good oven spring.
- Handling the dough. Use wet hands when performing folds or shaping to prevent sticking, and use rice flour for dusting the proofing basket and work surfaces.

Serving Suggestions
This type of bread shines both simply and creatively. Toast slices and top with smashed avocado, a sprinkle of chilli flakes, and a drizzle of olive oil for a perfect avocado toast breakfast. It also pairs beautifully with soft cheeses, hummus, or your favourite nut butter for weekend brunches.
For a savoury twist, serve alongside soups, stews, or as a base for open-faced sandwiches. Its nutty sesame seed sourdough flavour elevates almost any spread or topping.
Storage
To keep your loaf of bread fresh, store it at room temperature for 2-3 days wrapped in a clean kitchen towel or in a bread box. This allows the crust to stay crisp while preventing the crumb from drying out.
For longer storage, you can freeze the bread either as a whole loaf of bread or in individual slices. Wrap the bread tightly in plastic wrap, then place it in a freezer-safe bag. To enjoy, defrost whole loaves at room temperature or toast slices straight from the freezer for a quick snack with a nutty crunch.
More Sourdough Bread Recipes With Inclusions
Love experimenting with sourdough mix-ins? Why not try some of our other favourite sourdough bread recipes with inclusions next time?


Sesame Sourdough Bread
Equipment
- Bench Knife
- Proofing Basket
- Razor Blade or Bread Lame
- Cooling Rack
Ingredients
- 400 g strong bread flour with at least 12% protein content
- 50 g sesame seeds we used 25g black and 25g white sesame seeds
- 160 g active sourdough starter 100% hydration
- 280 ml water
- 1 tablespoon honey
- 7 g salt
- 1 tablespoon tahini optional
- 2-3 tablespoon mixed sesame seeds for sesame crust
Instructions
DAY 1:
Feeding Your Starter
- First thing in the morning, feed your sourdough starter. I typically feed 70g of my starter in a ratio of 1 part starter:1 part water:1 part flour. This simply means that I mix 70g of starter with 70g water and 70g flour. Scoop the mixture into a clean jar, and leave it in a warm spot (ideally, 21-27°C), semi-covered for 4 hours. Your starter should at least double in volume in this time. If it doesn't, it may need a couple of good feeds before it's fit for purpose (more information HERE).
- I use 160g of active starter for baking and feed the remaining 50g before storing it for the future.
Mixing The Dough
- Once the sourdough starter is active and bubbly (and at least doubled in volume), mix the dough. I use a stand mixer for this. Simply mix the flour and sesame seeds in the bowl of a stand mixer. Then add sourdough starter.
- In a jug, mix the water with honey, salt and tahini (optional). Pour the mixture into the stand mixer bowl.
- Run the mixer, fitted with a dough hook attachment for 10 minutes, until your dough is smooth and elastic. It does not need to pass the windowpane test just yet (the gluten will continue developing when we fold the dough during the bulk fermentation period).
Coil Folds and Bulk Fermentation
- Scoop the dough into a large bowl, cover with a damp kitchen towel or plastic wrap and leave it in a warm place (21-27°C) for 30 minutes.
- After 30 minutes, with cold wet hands, perform the first set of coil folds. Simply lift the bread dough with both hands from the sides and tuck it under to form a coil (video below). Rotate the bowl a quarter turn and coil again. Cover the bowl again, and let the dough rest for 30 minutes again.
- Repeat the process 3 more times at 30-minute intervals. For more information on how to coil fold and when to know when you've done enough folding, head to our dedicated article about Sourdough Coil Folds.
- Once all the folds have been completed, cover the dough and let the dough rise at warm room temperature for 2-3 hours to finish bulk fermentation. Your dough should just about double its original size. If you are using a see-through glass bowl for bulk fermenting, you should see a lot of activity and bubbles forming at the base and sides of the bowl.
Shaping, Topping and Cold Proof
- Scatter the sesame seeds for topping in a wide shallow bowl. Prepare your banneton basket (or any other proofing basket alternatives). Don't use too much flour to dust it.
- At the end of sourdough bulk fermentation, scoop the dough onto the kitchen surface. Then swiftly fold the four corners of the dough into the centre, forming a tight ball.
- Pick up the dough by the seam with your hand and place it into the bowl of sesame seeds, pressing and swirling it around for the seeds to stick to the bottom. Then lift the dough ball with seeds at the bottom into your proofing basket.
- The seeded side of the sourdough ball should be at the bottom, with the seam at the top.
- Pinch the seam together with your fingers, if the dough starts spreading in the bowl to make sure the dough is tight. Sprinkle with some flour, and cover the dough with a clean fabric napkin or small lightweight tea towel.
- Place the proofing basket in a large plastic bag - it will protect the dough from drying out. Then place the whole thing in the fridge for its final rise (a.k.a. second rise) in the fridge for 12-36 hours.
DAY 2
- The next day, place the Dutch Oven in the oven, and preheat it to 240°C (typically, it is the highest temperature home ovens will go to) with the Dutch oven in it. It needs to be piping hot!
Scoring The Dough
- Once the oven is hot, take the dough out of the fridge and out of the bag.
- Invert the dough gently onto a large piece of parchment paper. If your dough was properly bulk fermented and shaped correctly, it should not spread once inverted.
- Using a bread lame or a razor blade, score the dough deeply (approximately 1cm deep) at a 30- 45º angle. One single deep slash is all that's needed for that sought-after sourdough "ear". The blade may catch on the seeds, but be assertive.
Baking
- Take the hot Dutch Oven out of the oven, take the lid off, and lift the sourdough into it, holding the edges of the parchment paper. Be mindful of how you lift the paper. Sometimes, the scored slash can begin to close up during this process. To prevent this, lift the parchment from the sides that won't push the two edges of the scored dough back together.
- Place the lid back on the Dutch Oven and place the bread into the hot oven for 30 minutes.
- After 30 minutes, reduce the temperature to 200°C, take the lid off, and return the sourdough to the oven for another 20 minutes.
Cooling
- Once baked, take the Dutch Oven out of the oven. Lift the bread out by holding the corners of the parchment paper. Place the bread onto the wire rack, and slide the parchment paper from underneath the loaf.
- Leave the sourdough to cool down to room temperature before slicing.
Video
Nutrition




Leave a Reply