
If you've been dreaming of baking great rye bread at home, you're in the right place! This guide to homemade Rye Sourdough Bread will have you feeling like an artisan baker in no time. With its earthy flavour, satisfying chew, and hearty texture, artisan rye sourdough is the perfect addition to your baking repertoire-and yes, you can absolutely do it! Let's dive in and bring that bakery-style goodness straight to your kitchen.

Jump to:
As an Amazon Associate I earn from qualifying purchases, at no extra cost for you! Thank you!
How Does Rye Flour Affect Sourdough?
Flavour Profile: Earthy, slightly tangy, and robust, enhancing the bread's complex flavour. You can get light, medium and dark rye flour, with the flavour intensifying with the darker rye.
Dough Characteristics: Rye flour absorbs a lot of water but creates a stickier, less elastic dough.
Fermentation Process: It ferments faster due to high enzyme activity from the whole grains, so watch the dough to avoid overfermenting.
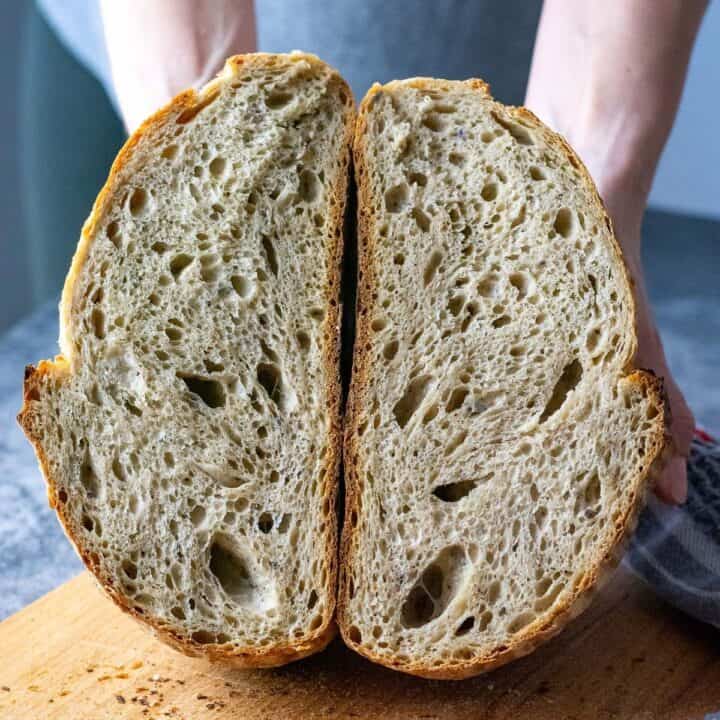
Gluten Content: Rye flour contains less gluten, resulting in an initially sticky dough, denser crumb and less rise.
Replacement Ratio: Begin with 20-25% of the total flour. Too much rye can make the dough challenging to handle, but as you practice and understand how rye flour behaves, feel free to increase the amount of it.

Next time, try our French Sourdough Bread, known as Pain De Campagne - it uses both rye and whole wheat flour.
Ingredient Notes
- strong white bread flour: with a protein content of at least 12%. You may also replace up to 100g of it with strong whole wheat flour (or try our 100% Whole Wheat Sourdough Bread).
- rye flour: we use whole grain rye flour (also known as whole rye flour or wholemeal rye flour).
- salt.
- water: lukewarm water helps the treacle dissolve quickly. It also gives the fermentation process a head start.
- black treacle or molasses: our rye sourdough does not taste sweet, but a little bittersweet taste makes a big difference and enhances the flavour of the grains. You can use dark brown sugar instead.
- active sourdough starter: 100% hydration.

You can find a full ingredient list, detailed instructions and nutritional information in the recipe card at the bottom of the post.
Delicious Mix-Ins For Rye Sourdough
For use, this earthy rye sourdough bread leaves nothing to be desired, but if you fancy experimenting with some mix-ins, we don't blame you. Here are a few things that pair particularly well with rye:
- SEEDS: we like adding mixed seeds: like sunflower, flax and pumpkin seeds. Alternatively, a little bit of caraway seeds add a slightly sweet and peppery flavour that works wonders. Try out Flaxseed Sourdough, but with a little rye mixed in. Or go for Sunflower Seed Sourdough Bread instead!
- GRAINS: Try laminating some oats midway through coil folds or try some cracked rye or whole rye berries for a chewy texture and enhanced flavour of rye.
- NUTS: we tried this sourdough rye bread with walnuts and pecans and would recommend both.

Mix It Up: Turn Your Sourdough into a Flavour Adventure.
Step-By-Step Method
My Sourdough rye bread is made over two days: I mix, bulk ferment and fold the dough on day 1, then leave it in the fridge overnight. On day 2, I score, bake and eat!
DAY 1
Mixing The Dough
1. First thing in the morning, feed your sourdough starter and leave it in a warm spot (ideally, (21-27°C)), semi-covered for 4 hours. Your starter should at least double in volume in this time. If it doesn't, it may need a couple of good feeds before it's fit for purpose since sourdough completely relies on wild yeast for a nice rise (no commercial yeast in sight).
You can learn more about how to replace yeast with sourdough starter HERE!
2. Once the sourdough starter is active and bubbly (and at least doubled in volume), mix the dough. Mix strong white flour, rye flour and salt in the bowl of a stand mixer.
3. In a separate bowl or a jug, mix warm water and treacle until well combined. Pour this mixture into the dry ingredients. Add the active and bubbly starter.

4. Run the mixer, fitted with a dough hook attachment for 10 minutes, until your dough is smooth and elastic. It does not need to pass the windowpane test just yet (the gluten will continue developing when we fold the dough.

The windowpane test is a technique used in bread baking to check if the dough has been kneaded enough to develop proper gluten structure. To perform the test, a small piece of dough is stretched thinly between fingers; if it stretches into a translucent "window" without tearing, the gluten is well-developed and the dough is ready for fermentation.
But Wait, What About Autolyse?
When I make this rye sourdough bread, I don't always autolyse. I find that it is a lot easier to distribute the treacle or molasses throughout the dough if I first mix it with water. Autolyse has lots of benefits, which you can read about in our dedicated article about the sourdough autolyse process. However, rye is high in amylase enzymes that break down the complex starches into simple sugars and it ferments a lot quicker.
As a result, I do not autolyse this particular bread dough. If you choose to autolyse, however, don't autolyse for longer than 30 minutes, and hold back some of the water to mix with the treacle at the end.
Coil Folds and Bulk Fermentation
1. Scoop the wet dough into a large bowl, cover with a damp towel or plastic wrap and leave it in a warm place (21-27°C) for 30 minutes.
2. After 30 minutes, with cold wet hands, perform the first set of coil folds. Simply lift the bread dough with both hands from the sides and tuck it under to form a coil (video below). Rotate the bowl a quarter turn and coil again. Cover the bowl again, and let the dough rest for 30 minutes again.

3. You should repeat the process every 30 minutes until you have done 4-6 sets of coil folds. Your dough will spread less with every set of folds, and by the end of it, you will have a much less sticky, very soft and elastic dough that has blisters on top of the dough.
For more information on how to coil fold and when to know when you've done enough folding, head to our dedicated article about Sourdough Coil Folds.
4. Once all the folds have been completed, cover the dough and let the dough rise at warm room temperature for 2-3 hours to finish bulk fermentation. Your dough should just about double its original size. If you are using a see-through glass bowl for bulk fermenting, you should see a lot of activity and bubbles forming at the base and sides of the bowl.

Shaping and Cold Retard
1. At the end of bulk fermentation, using a bowl scraper, scoop the dough onto a lightly floured surface. Try and make sure that the smooth top of the dough (the side that is not intact with the bowl) is placed on the floured work surface. Then swiftly fold the four corners of the dough into the centre and flip the dough over.
2. With your bench scraper held at a shallow angle to the work surface, push the dough while using your hand to tuck it under itself, creating surface tension. This fluid circular motion involves pushing and gently rounding with the bench knife, while your free hand continues the rounding motion, tucking the dough slightly under itself. It takes some practice, but you should aim for a tight round ball of dough that holds its shape and doesn't spread much.
3. Place the dough ball into a well-floured banneton basket (or any proofing basket alternatives). We recommend using rice flour for dusting your proofing baskets. The smooth side of the sourdough ball (top of the loaf) should be at the bottom, with the seam at the top.

4. Pinch the seam together with your fingers, if the dough starts spreading in the bowl to make sure the dough is tight. Sprinkle with some flour, and cover the dough with a clean fabric napkin or small lightweight tea towel.
5. Place the proofing basket in a large plastic bag - it will protect the dough from drying out. Then place the whole thing in the fridge for its final rise (a.k.a. second rise) in the fridge for 12-36 hours.
If you wish, you can bake sourdough in a loaf pan! Head to our article about baking sourdough in a loaf pan to learn more!
DAY 2
Preheating Dutch Oven
1. The next day, place the Dutch Oven in the oven, and preheat it to 240°C (typically, it is the highest temperature home ovens will go to) with the Dutch oven in it. It needs to be piping hot!
Scoring Sourdough
1. Once the oven is hot, take the dough out of the fridge and out of the bag.
2. Invert the dough gently onto a large piece of parchment paper. If your dough was properly bulk fermented and shaped correctly, it should not spread once inverted.

3. Dust the surface of the dough with flour. Using a bread lame or a razor blade, score the dough deeply (approximately 1cm deep) at a 30- 45º angle. One single deep slash is all that's needed for that sought-after sourdough "ear".
Baking
1. Take the hot Dutch Oven out of the oven, take the lid off, and lift the sourdough into it, holding the edges of the parchment paper. Be mindful of how you lift the paper. Sometimes, the scored slash can begin to close up during this process. To prevent this, lift the parchment from the sides that won't push the two edges of the scored dough back together. Or try baking sourdough in an inverted Dutch Oven.
2. Place the lid back on the Dutch Oven and place the bread into the hot oven for 35 minutes.

3. After 35 minutes, take the lid off, and return the sourdough to the oven for another 15-20 minutes. If you don't want your loaf of bread too dark in colour, you can reduce the oven temperature to 200°C.
Cooling
1. Once baked, take the Dutch Oven out of the oven. Lift the bread out by holding the corners of the parchment paper. Place the bread onto the wire rack, and slide the parchment paper from underneath the loaf.
2. Leave the rye sourdough to cool down to room temperature before slicing.

Storage
You can keep homemade sourdough bread fresh at room temperature for up to 3 days by storing it in an airtight container, a ziplock bag, a bread box, or wrapped in a tea towel.
For longer storage, freezing is your best bet-it freezes really well! Check out the articles below to learn more about storing sourdough bread:
Serving Ideas: What To Pair Sourdough Rye Bread With?
Rye sourdough bread is like the life of the party-it goes with just about everything! For a classic pairing, try it with a hearty soup or stew; the bread's robust flavour is perfect for soaking up all that delicious broth. Fancy something a bit more continental? Serve it with smoked salmon, cream cheese, and a squeeze of lemon for a tasty twist.
It's also brilliant toasted with a slather of butter, a generous slice of cheese, or topped with your favourite jam for a quick and comforting snack. Or used to make New York Classic - Reuben Sandwiches!

And let's not forget the ultimate combo-rye sourdough and a good old-fashioned Ploughman's lunch, with a hunk of cheese, some pickles, and a slice of apple. Yum!
Recipe FAQs
Whilst a rye sourdough starter would only enhance the flavour of whole-grain rye, it is not necessary. As a matter of fact, we made this recipe with our standard white wheat flour sourdough starter.
Whilst all-purpose flour won't affect the flavour, we don't recommend using it. Rye flour is lower in gluten, so you do want strong, protein-rich white flour to ensure strong gluten networks in the dough.

More Sourdough Recipes To Try Next Time
After mastering this rye sourdough bread, why not try your hand at other delicious sourdough recipes like sourdough baguettes, sourdough focaccia, or even a sweet sourdough cinnamon roll? Or go ahead and try some other types of flour: here's our Spelt Sourdough, Einkorn Sourdough and Barley Sourdough Bread recipes.
Some delicious ideas also await below:




Sourdough Rye Bread Recipe
Equipment
- Bench Scraper
- Razor Blade or Bread Lame
Ingredients
- 300 g strong white bread flour with protein content of at least 12%
- 100 g rye flour
- 7 g salt
- 260 ml water lukewarm
- 1 tablespoon black treacle or molasses
- 160 g active sourdough starter 100% hydration
Instructions
DAY 1:
Mixing The Dough
- First thing in the morning, feed your sourdough starter and leave it in a warm spot (ideally, (21-27°C)), semi-covered for 4 hours. Your starter should at least double in volume in this time. If it doesn't, it may need a couple of good feeds before it's fit for purpose.
- Once the sourdough starter is active and bubbly (and at least doubled in volume), mix the dough. Mix strong white flour, rye flour and salt in the bowl of a stand mixer.
- In a separate bowl or a jug, mix the water and treacle until well combined. Pour this mixture into the dry ingredients. Add the sourdough starter.
- Run the mixer, fitted with a dough hook attachment for 10 minutes, until your dough is smooth and elastic. It does not need to pass the windowpane test just yet (the gluten will continue developing when we fold the dough.
Coil Folds And Bulk Fermentation
- Scoop the dough into a large bowl, cover with a damp kitchen towel or plastic wrap and leave it in a warm place (21-27°C) for 30 minutes.
- After 30 minutes, with cold wet hands, perform the first set of coil folds. Simply lift the bread dough with both hands from the sides and tuck it under to form a coil (video below). Rotate the bowl a quarter turn and coil again. Cover the bowl again, and let the dough rest for 30 minutes again.
- You should repeat the process every 30 minutes until you have done 4-6 sets of coil folds. Your dough will spread less with every set of folds, and by the end of it, you will have a much less sticky, very soft and elastic dough that has blisters on top of the dough. For more information on how to coil fold and when to know when you've done enough folding, head to our dedicated article about Sourdough Coil Folds.
- Once all the folds have been completed, cover the dough and let the dough rise at warm room temperature for 2-3 hours to finish bulk fermentation. Your dough should just about double its original size. If you are using a see-through glass bowl for bulk fermenting, you should see a lot of activity and bubbles forming at the base and sides of the bowl.
Shaping and Final Proof
- At the end of bulk fermentation, using a bowl scraper, scoop the dough onto a lightly floured surface. Try and make sure that the smooth top of the dough (the side that is not intact with the bowl) is placed on the floured work surface. Then swiftly fold the four corners of the dough into the centre and flip the dough over.
- With your bench scraper held at a shallow angle to the work surface, push the dough while using your hand to tuck it under itself, creating tension. This fluid circular motion involves pushing and gently rounding with the bench knife, while your free hand continues the rounding motion, tucking the dough slightly under itself. It takes some practice, but you should aim for a tight round ball of dough that holds its shape and doesn't spread much.
- Place the dough ball into a well-floured banneton basket (or any proofing basket alternatives). We recommend using rice flour for dusting your proofing baskets. The smooth side of the sourdough ball should be at the bottom, with the seam at the top.
- Pinch the seam together with your fingers, if the dough starts spreading in the bowl to make sure the dough is tight. Sprinkle with some flour, and cover the dough with a clean fabric napkin or small lightweight tea towel.
- Place the proofing basket in a large plastic bag - it will protect the dough from drying out. Then place the whole thing in the fridge for its final rise (a.k.a. second rise) in the fridge for 12-36 hours.
DAY 2:
- The next day, place the Dutch Oven in the oven, and preheat it to 240°C (typically, it is the highest temperature home ovens will go to) with the Dutch oven in it. It needs to be piping hot!
Scoring The Dough
- Once the oven is hot, take the dough out of the fridge and out of the bag.
- Invert the dough gently onto a large piece of parchment paper. If your dough was properly bulk fermented and shaped correctly, it should not spread once inverted.
- Dust the surface of the dough with flour. Using a bread lame or a razor blade, score the dough deeply (approximately 1cm deep) at a 30- 45º angle. One single deep slash is all that's needed for that sought-after sourdough "ear".
Baking
- Take the hot Dutch Oven out of the oven, take the lid off, and lift the sourdough into it, holding the edges of the parchment paper. Be mindful of how you lift the paper. Sometimes, the scored slash can begin to close up during this process. To prevent this, lift the parchment from the sides that won't push the two edges of the scored dough back together.
- Place the lid back on the Dutch Oven and place the bread into the hot oven for 35 minutes.
- After 35 minutes, take the lid off, and return the sourdough to the oven for another 15-20 minutes. If you don't want your loaf of bread too dark in colour, you can reduce the oven temperature to 200°C.
Cooling
- Once baked, take the Dutch Oven out of the oven. Lift the bread out by holding the corners of the parchment paper. Place the bread onto the wire rack, and slide the parchment paper from underneath the loaf.
- Leave the rye sourdough to cool down to room temperature before slicing.
Nutrition




Leave a Reply